
The writing of tests is a pretty big part of the average microservice’s development cycle. Not only is it good for catching current and future issues in our code early, but it also works as a way to document the code’s expected behavior.
Maintaining high stability and consistency is especially important in GRID’s management of real-time data, as issues can be difficult to detect and undo in time for delivery. In many cases, the original data will simply not be available for a redo, so any misstep the live data takes can be critical.
To maintain a high level of test coverage we write our Go tests utilizing the built-in testing package, as it is very rich in features and it makes our tests easy to write.
In this article we’ll share some of our practices for Go testing that may help one write more manageable and reliable tests, as well as a healthier code base.
Use the built-in testing package
To start with, we need to use the provided built-in testing package. To add a unit test to a function for example, add a testing file to the same package as the function to be tested. By convention, the unit tests’ file should have the same name as your functions followed by _test (e.g. foo_test.go for a file called foo.go).
For a unit test to be recognized as such, the name of the test function should start with a prefix “Test” and should take *testing.T as its only parameter. By convention, the tests are usually named after the function that they’re testing (e.g. TestFoo for a function called Foo).
Here’s an example of a simple unit test of a function :Foo
To run one’s tests, use the go test tool (append ./... to run all packages in your current folder):
func Test_Foo(t *testing.T) {
 var tests = []struct {
  name string
  input string
  want  string
 }{
  {"yellow should return color", "yellow", "color"},
  {"banana should return fruit", "banana", "fruit"},
  {"duck should return animal", "duck", "animal"},
 }
 for _, test := range tests {
  t.Run(test.name, func(t *testing.T) {
   actual := Foo(test.input)
   if actual != test.want {
    t.Errorf("got %s, want %s", actual, test.want)
   }
  })
 }
}
And here’s an example of some tests structured using nested t.Run functions:
func Test_MyStuct(t *testing.T) {
 t.Run("ParseString", func(t *testing.T) {
  t.Run("should return true on valid string", func(t *testing.T) {
   ...
  }
  t.Run("should return false on invalid string", func(t *testing.T) {
   ...
  }
 }
 t.Run("ParseInt", func(t *testing.T) {
  t.Run("should return true on valid integer", func(t *testing.T) {
   ...
  }
  t.Run("should return false on invalid integer", func(t *testing.T) {
   ...
  }
 }
}
Subtests called by the same testing function will, generally, run in series, and will run through all subtests even if an earlier subtest has failed. In the cases where one would prefer the tests to run in parallel there’s instead the t.Parallel method. t.Parallel is called the same way as t.Run, but all subtests of a single test function that is called using t.Parallelt.Parallelt.Run
Use the assert library
In addition to the built-in testing framework it is also highly recommended to use the github.com/stretchr/testify/assert library. Using this library, one can make tests simpler and easier to read, mainly by simplifying complex checks for expected results. By simply passing the expected and actual values to a one-line function, the library will manage and log the checking of the result as well as marking the full test as failed on failure.
Here’s an example of how one might use assert.Equal function in a test:
func Test_MyFunction(t *testing.T) {
  result := MyFunction() expected := "some expected value"
  assert.Equal(t, expected, result, "they should be equal")
}
The library also provides many other useful functions, such as assert.True, assert.Nil, assert.Error, assert.ElementsMatch, assert.WithinDuration, and many others.
On failure the assert functions will generally let the test continue, allowing for multiple assert failures to be recorded in a single run of a test. In the cases where one would rather let the tests stop on failure there’s an accompanying library github.com/stretchr/testify/require, which performs the exact same checks as the assert library, but it instead stops the test on the first assert failure.
Run coverage tests
To check one’s tests’ coverage and generate coverage reports, the go test command offers the -cover flag. When one runs tests with the -cover
Here’s an example of running a coverage test on a simple project:
$ go test -cover ./...
ok      MyProject 0.003s  coverage: 50.0% of statements
This runs all tests found in the given directory and responds with the percentage of code covered by the tests.
Just getting the percentage is not always enough, as it can be hard to figure out what part of one’s code is lacking in coverage. To get more detailed information out of the coverage test there’s the -coverprofile flag. This flag allows one to specify a file to which the detailed coverage profile will be written. Using this profile one can generate a coverage report using the go tool cover command.
Here’s an example of a coverage report being generated, in this case an html report:
$ go test -cover -coverprofile=coverage.profile
ok      MyProject 0.003s  coverage: 50.0% of statements
$ go tool cover -html=coverage.profileUsing the coverage reports can more easily identify areas of one’s code that are not covered by tests in a visual and customizable way.
Check for race conditions in your tests
A common cause for flaky and unreliable tests is race conditions. These are cases where parallelized operations behave inconsistently depending on the condition in which they’re run. For example, when run on a local machine or later run in a pipeline. In Go, these most often occur when working with goroutines, and they can be quite difficult to catch while implementing tests.
To help detect instances of race conditions the go test-race flag. The flag adds data race detection for the tests. When one runs tests with this flag the testing tool will detect and notify if any data race occurs. If a data race is detected, it will report an error and provide information about the location of the race.
Here’s an example of a basic race condition, and how the testing tool detects it:
func Test_MyFunction(t *testing.T) {
 expected := 4
 actual := expected
 go func() {
  actual = 5
 }()
 if expected != actual {
  t.Fail()
 }
}
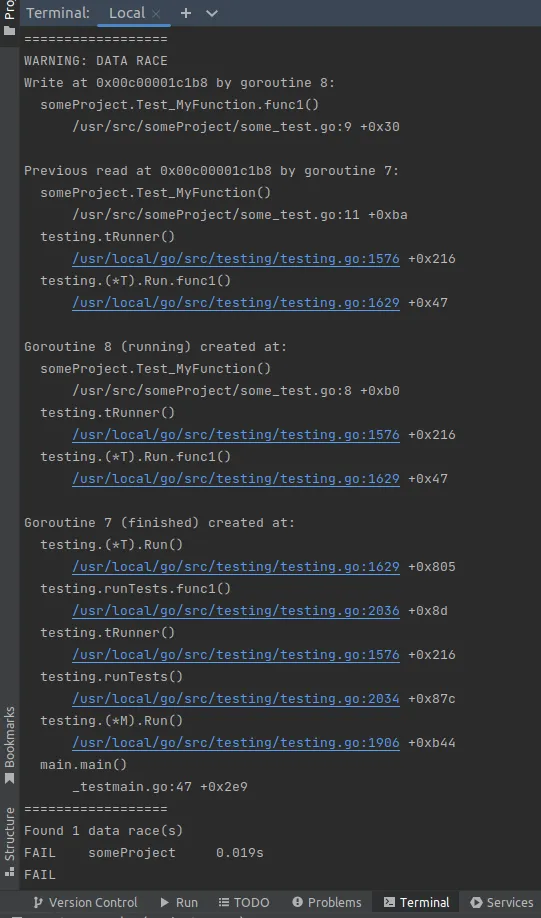
The tests that have race conditions are treated as failing tests and the logs show the location of the affected data and the goroutines that are involved.
We hope these tips and best practices will help you along the way as you build your code, making your tests consistent and reliable, and saving you time in the long run.
Make sure to follow GRID on LinkedIn and Twitter for news and updates on esports and game data- and keep an eye out for future articles from the GRID Engineering Team for help in building your esports applications!